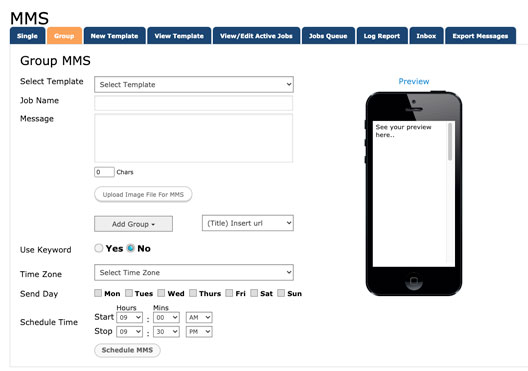
1. Click tab entitled “MMS” on the tool bar at the top of page.
2. Click tab entitled “Group”.
3. If you choose to send a pre-made message, select the message from the template drop down menu.
4. Type the name of your texting campaign in the box entitled “Job Name”.
5. Type the text in which you want to go along with the image sent (If any) in the box entitled “Message”.
6. Click the blue text entitled “Select MMS (picture) File”. Select picture, you wish to send (preferably .JPEG).
7. Click drop down menu entitled “Add Group”.
8. Select the group you wish to send the message to.
9. Choose whether you wish to accept a reply or not. (If yes, you must set up a keyword. It is not necessary to accept a reply)
10. Select the timezone you wish to set the start time of the job.
11. Select the day you wish to send out the message to all contacts.
12. Schedule a start time and a stop time for the job. Please note, if the message is being sent to a large number of contacts, please set up at least an 8 hour window between the start and stop time of the job. It does not mean it will take 8 hours to send to every contact. It just allows the system enough time to send to every recipient without the chance of stopping before all the messages have been sent out.
13. Click the button entitled “Schedule MMS”.
